"You did well to delay them lass," he said, turning to his daughter. "It'll take them time to be ready, and we're well supplied and dug in."
"Yes father," Zoe said, grimly, "but a lot of brave warriors died to hold them back. I'll make them pay for every life they took."
"Patience my Princess," Lord Durak said. "They haven't a hope of breaching these walls with their foul Chaos weapons."
"Dawi-Zharr," the keen-eyed Borri suddenly called out. "They have brought Dawi-Zharr."
Lord Durak pulled out his telescope and gazed into the distance. He could just make out the shape of a Chaos Dwarf overseer barking orders to two assistants assembling a rocket on a carriage. This was dark news, the weapons of the Chaos Dwarfs might be able to breach the walls.
"We have to strike now, before they're ready," Thane Zoe said. "I'll the attack."
Lord Durak nodded grimly, he didn't want to risk his daughter, but the situation was desperate.
"In that case, take your mother's axe," he said. "It's strike faster and truer than any other weapon. And may Grimnir go with you."
One of the nice features of the Chaos Dwarf rules in the Tamurkhan book was the inclusion of rules that allowed you to add Chaos Dwarf units to your Chaos Warrior army. When I decided to play a siege campaign I knew I had to include a few Chaos Dwarfs, and this was my first opportunity.
The scenario - Sally Out (number 7 in Warhammer Siege) would be a tough one for the dwarfs. Their objective was to make their way across the table and get into contact with an objective marker representing the Chaos army's ammunition and supplies. Each turn they stayed in contact they could roll a dice and on 4+ it was destroyed. With only five turns, it was going to be tight, but if they succeeded, the Chaos army would have to pay double points for all their war machines in the final assault.
The dwarfs had one trick up their sleeves in them form of a unit of miners. I decided to add an extra rule that the miners could not enter the table within 12" of the objective as that would make things a little easy. Miners didn't have the ambush rule in 5th edition, so this wouldn't have been thought of at the time.
I also made a slight change to deployment. The fortress was supposed to be deployed 12" forward and the dwarfs inside, but rather than mess around moving through the gate I moved the fortress back and allowed the dwarfs to deploy 12" forward instead.
The army line up was as follows:
Dwarfs
Thane Zoe (with the ability to re-roll her combat dice once per battle and now equipped with the Master Rune of Swiftness and a Rune of Stone).
20 Longbeards
12 Warriors with great weapons
12 Slayers
12 Miners (ambushing)
1 cannon (deployed on the battlements as per the scenario rules)
Chaos
Chakram Manflayer (with Iron Hard skin from the last game)
Chaos Dwarf Daemonsmith (with the spell Searing Doom from the Lore of Metal)
20 Chaos Marauders with Flails and the Mark of Slaanesh
20 Chaos Marauders with Hand Weapons and Shields
10 Chaos Hounds
5 Chaos Knights
1 Chaos Dwarf Shrieker Rocket

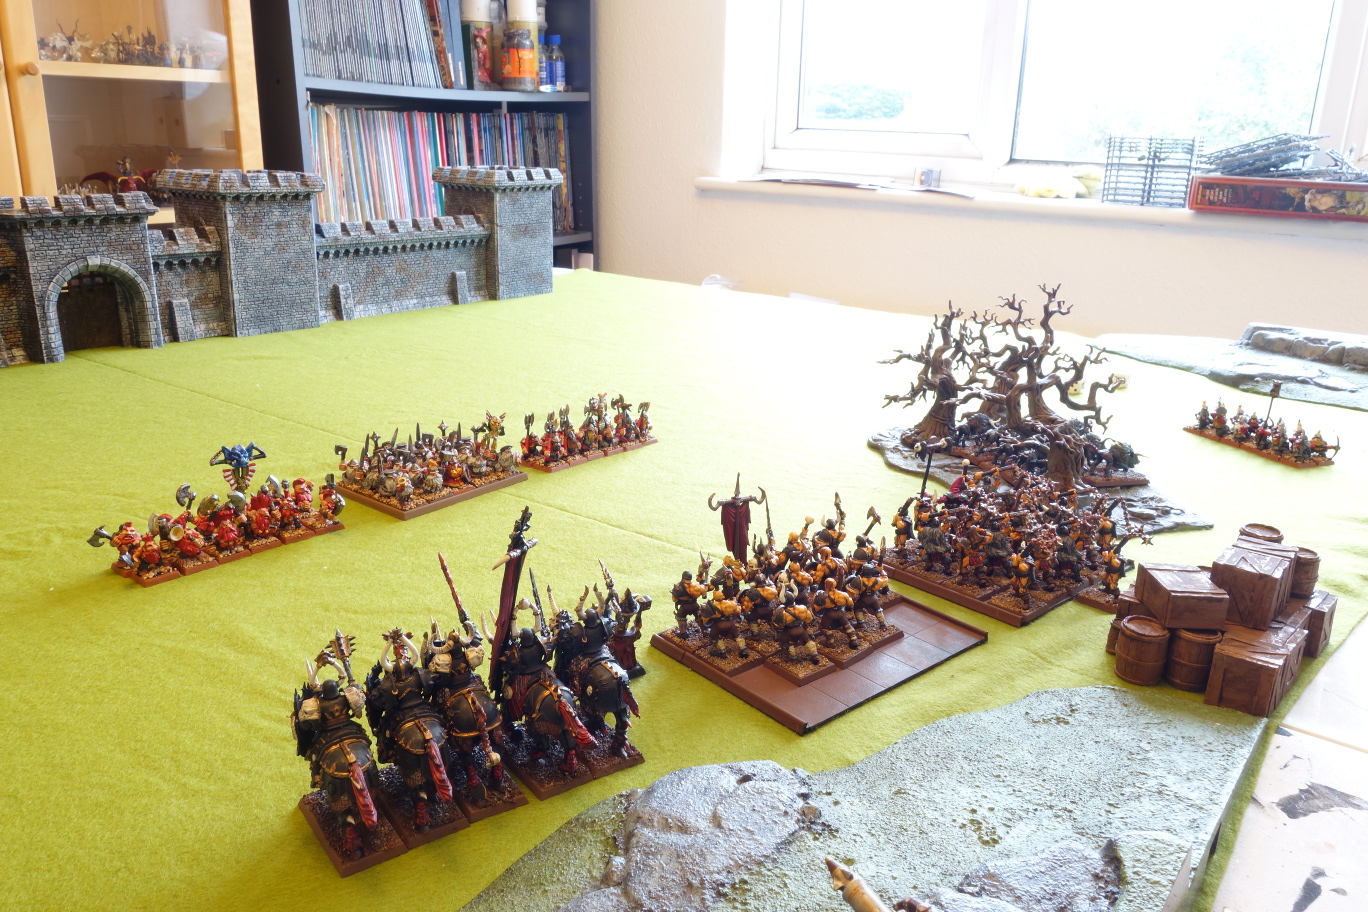
Deployment
Apologies for the odd lighting quality of some of the pictures below. I was trying use natural light as much as possible, but it got too poor at the end of the battle and I had to switch the light on. I thought I had the right setting on my camera to compensate, but, evidently, it turned itself off after the first shot and so the rest look a bit orange.
The Besieged Dwarfs automatically took the first turn.
Dwarf Turn 1
The dwarfs advanced as rapidly as their stumpy legs would carry them, under cover fire from the cannon, which managed to kill 2 Marauders.

Chaos Turn 1
The Chaos line held position, defending the supplies. Only the Daemonsmith moved forward into spell range. Despite successfully casting the spell, it was easily dispelled by the dwarfs natural magic resistance. The Shrieker rocket targeted the cannon with a demolition shell, but scattered and failed to hit the target.

Dwarf Turn 2

The miners arrived right on schedule, tunnelling their way to the back of the Chaos line, as close to the supplies as they could get. They manoeuvred quickly towards the Chaos Hounds in the wood. 4 more Marauders were blown to pieces by cannon fire, but this was still one too few to force a panic test.

Chaos Turn 2

The Hounds changed position to face the Miners, making sure that if they got charged, it wouldn't be in the rear. Otherwise, the Chaos line held position again. Having rolled a 5 and a 1 for the Winds of Magic, the Daemonsmith risked all the dice on casting Searing Doom on the Longbeards, but again the Dwarfs dispelled it. The Shrieker rocket overshot the Longbeards, catching one of them, but failing to wound.
Dwarf Turn 3
The Miners attempted to charge the Chaos Hounds, but rolled low and failed to contact. Cannon fire killed 1 Marauder and the rest of the Dwarfs advanced again, making sure they were lined up so that if any of the Chaos units failed a charge, they would be in a good position to counter charge in turn 4.
Chaos Turn 3
The dwarfs were close enough for a charge, but the line up was not looking favourable. With that in mind, the Chaos Knights crossed the line to charge the Longbeards, while Chakram Manflayer lead his Marauders against the Warriors. The remaining Marauders elected not to charge, instead moving to protect the Knights left flank from the Slayers. On the Chaos right flank, the Chaos Hounds charged the Miners.

Having rolled a double 6 for the Winds of Magic, the Daemonsmith decided to go for broke and cast Searing Doom on maximum power with 8 dice. Unsurprisingly, he miscast, but the resulting spell caused 10 hits on the Longbeards and killed 7. Unfortunately for the Daemonsmith, the resulting backlash cost him his level and his only spell.
The Shrieker Rocket finally fired on target, hitting the Slayers and killing five.

The Miners and the Hounds traded blows, killing one each. The Miners won the combat by 1 and the Hounds fled, though the Dwarfs failed to catch them.

Chakram Manflayer challenged the Dwarf Veteran and, unsurprisingly, killed him gaining Unearthly reflexes (+1 initiative) for his trouble. 4 more dwarfs were killed, but they retaliated by killing 5 Marauders. Ranks and the charging bonus made the difference and the dwarfs fled, though Manflayer had his Marauders hold position. The Dwarfs had no chance of reaching the supplies now.
The Doom Knight challenged Thane Zoe, but her Master Rune of Swiftness proved to be a worthwhile investment. She struck first, hit and wounded twice and, despite a save of 3+, the Doom Knight failed one save and was killed. One Knight and one Longbeard were killed and the Dwarfs won 4 - 3. Remarkably, the Chaos Knights failed the break test on a double 6. Even more remarkably, the Longbeards pursued and caught up with them, catching the Marauders in the flank.

Dwarf Turn 4
Not letting the Longbeards hog all the glory, the Slayers charged the Marauders from the front. Meanwhile, the Warriors rallied and the Miners continued their advance on the supplies.

With their previous target engaged in combat, the Cannon target Chakram Manflayer's Marauders, killing three, though, thanks to the Mark of Slaanesh, they were immune to panic.

The Marauder Chieftain was compelled to issue a challenge and was, unsurprisingly, cut to pieces by the Giant Slayer. Inspired by his example, the dwarfs killed 10 Marauders between them, suffering no casualties in return. In the face of a 15 - 1 victory, the Marauders broke. The Slayers pursued but the Longbeards, clearly still fired up, failed their restrained test and took of as well. The Slayers out paced them however and slammed straight into the Daemonsmith.

Chaos Turn 4
Despite being in site of their general, the Chaos Hounds failed to rally and ran through the Marauders, who, again, benefited from their immunity to panic. They may have been slightly disconcerted, however, as they failed their leadership test for rapid reform and were only able to turn around.
The Shrieker rocket targeted the Miners. The rocket went off target, but then returned, killing three miners, though they passed their panic test.

The Daemonsmith decided not to buck the trend and challenged the Giant Slayer. The two attacked simultaneously and killed each other.

Dwarf Turn 5
This almost the Dwarf's last chance for victory. The Miners charged the objective and made it. The Warriors attempted a long charge against the Marauders in the hope of slowing them down, but failed to make it. Thanks to rolling a 10 on the misfire dice, the Cannon overshot the Marauders and failed to kill any of them.

The Miners needed to roll a 4 of more to destroy the objective. They rolled a 3. No victory yet.
The rule book was a little ambiguous about when the besieged rolled to see if they destroyed the objective. It just said for every combat round they stayed in contact with it. I decided that meant friendly or enemy combat rounds, but the Miners would have to stay in contact for the whole round. So if Chaos could destroy them, they would win.
Chaos Turn 5

The Marauders charged the Miners. The Chaos Hounds failed to rally, but no-one cared about them by this point. Chakram Manflayer challenged the Miner's Prospector and cut him down. He was rewarded with even more unearthly reflexes, for a total bonus of +2. Chakram and the Marauders won the combat 9 - 3 and the Miners broke, denying them a final chance to destroy the supplies.

The Chaos army was victorious.

If the last battle looked like it was going one way before suddenly going completely the other way, this battle was up in the air until the very last turn.
It was always going to be a tough one for the Dwarfs, but they performed admirably, the Miners doing exactly what was expected of them. But they benefited from some very lucky (or unlucky depending on who was doing it) rolling. The Knights breaking and then being run down was something they could never have relied on.
The Master Rune of Swiftness was well worth its weight in points for Thane Zoe, who once again performed admirably, gaining a battle honour in the process. Chakram Manflayer continues on his path to glory although these two enemies have yet to face one another in a challenge. It can only be a matter of time.
It was striking how many panic tests were avoided by units being immune to panic. The Longbeards, Slayers and Chakram's Marauders all avoided panic tests thanks to immunity. Without it, surely at least one test would have been failed and that would have made all the difference to the final outcome.
With the Dwarf's first siege turn complete, it's time for Chaos to plan its next move.