Wednesday, 29 May 2019

Shadow War Campaign Final Mission Part Two

Part Two of my report on the final mission of my Shadow War Campaign. Part One, covering the mission rules and deployment is here.

The Orks took the first turn and advanced quickly, swarming over the archeotech.


The Sisters of Battle advanced more cautiously, sending out a scout ahead while the rest followed on.


At the end of turn 1, the Dark Eldar and Blood Angels arrived, deploying on opposite sides on the far left and near right.


The Dark Eldar quickly found themselves under heavy fire from the Orks.


While the Sisters broke off part of their forces to pursue this new threat.


The Orks had seized much of the archeotech, but were now under heavy fire from all sides.


And at the end of the turn the Chaos Space Marines and Tau arrived.


The Sisters poured fire on to the Chaos Marines, doing no damage but keeping them pinned.


Meanwhile, the Seraphim seized their primary objective.


Despite being delayed by the Sisters and Orks, the Dark Eldar continued their advance.


While on the left, the firefight between the Orks and Tau was developing in the Tau's favour.


The Dark Eldar started to push through to the centre.


The Orks still had much of the Archeotech, but struggle to move it under fire from the Tau, Blood Angels and Dark Eldar.


Meanwhile, on the far side of the field, both the Chaos Marines and Sisters of Battle were pursuing the same objective. Most of the Sisters Kill-Team provided covering fire, while the Seraphim handed off the Data Bank to Sister's Ursula and Beatrice. The Sisters had little luck overcoming the Chaos Marines high toughness and armour, but while they were all pinned they couldn't advance.


Enough Orks had been taken down or out of action that the Dark Eldar were able to seize their primary objective, the weapons cache, and start to make progress towards their deployment zone.


The Tau were in difficulty. Their primary objective was the same as the Dark Eldar and they needed to move at top speed to get it, but they had to go through the remnants of the Orks to get it.

I hadn't considered, when planning this scenario, that the Shadow War rules require you to shoot at the nearest target unless a more distant target is easier to hit. This meant the Tau couldn't prioritise the Dark Eldar over the nearer Orks, even though killing Orks didn't help them achieve their primary goal.


But by the end of turn 5, enough Orks had recovered to make a decent go at recovering the Doomsday Device. They might not be able to take the bulk of the archeotech as they had hoped, but they could still achieve their primary objective. The Blood Angels and Dark Eldar had also secure their primary objectives, but were struggling to move them under heavy fire.


But it was the Sisters of Battle who would take the lead, carrying their primary objective off the battlefield first. Because they were second on the leader board, this meant that any Kill Team other than the Orks would need 4 Victory Points to beat them and win the campaign.


And that seems as good a place as any to take a break. We'll see how the other teams got on trying to catch the Sisters in part 3.

Sunday, 19 May 2019

Shadow War Campaign Final Mission Part One

When I last posted about my Shadow War campaign it was December 2018, I had just completed round 5 and four of the six Kill Teams had gathered the 10 data caches I had decided was necessary to finish the campaign. Since then, I let things go quiet, partly because I got absorbed in my Blood Angels and Death Guard painting project and partly because I needed the time and space to bring the campaign to a suitably climactic end.

The original Necromunda Campaign rules, on which Shadow War's rules are based, had nothing to say about actually ending a campaign. You simply continued to play games and build up your gang until everyone died, got bored or grew out of wargaming entirely.

Shadow War improved on this by introducing victory conditions using its concept of Promethium Caches. Once one Kill Team collected 15 caches, if they won one more mission they would win the campaign. So far, so basic. For my campaign I changed the Promethium Caches to Data Caches and reduced the required number for victory to ten. But I never wanted to end the campaign or just another basic mission, I wanted something suitably climactic to round every thing off and provide a proper sense of closure. I wanted nothing less than a no-hold barred, all against all, six way Kill-Team mega fight.

But doing this was going to take time and space. As may have been apparent from previous mission reports, I usually played Shadow War on a 4' x 4' space that took up just over half of the table in my hobby room. This allowed me to clear enough space for a game by just pushing everything else to one end of the table. But for a six team fight I needed more room. That meant utilising the whole table. Also, if a normal game of Shadow War between two Kill Teams took me a couple of hours to play through a six team game was going to be a lot longer. So I also had to wait for a completely free weekend.

A six way finale needed its own special rules. Plus, I also needed to give some advantage to the currently winning Kill Teams or the rest of the campaign would have been pointless. With that in mind I devised a scenery in which six valuable pieces of archeotech would be placed near the centre of the table. I also allocated six deployment zones. The Orks and Sisters of Battle, as the two Kill Teams at the top of the leader board would deploy first, giving them first shot at collecting the archeotech. The Dark Eldar Wyches and Space Marine Scouts would arrive on turn 2 and the Chaos Space Marines and Tau on turn 3. When they deployed, each team would be randomly allocated a specific piece of archeotech to be their primary target, which would be worth 3 victory points and the rest would be worth 1 each. The goal of each team would be to get as much archeotech of the table through their deployment zone as possible and, because this was the final mission, no-one would bottle out.

The rule rules I devised for the scenario are here.

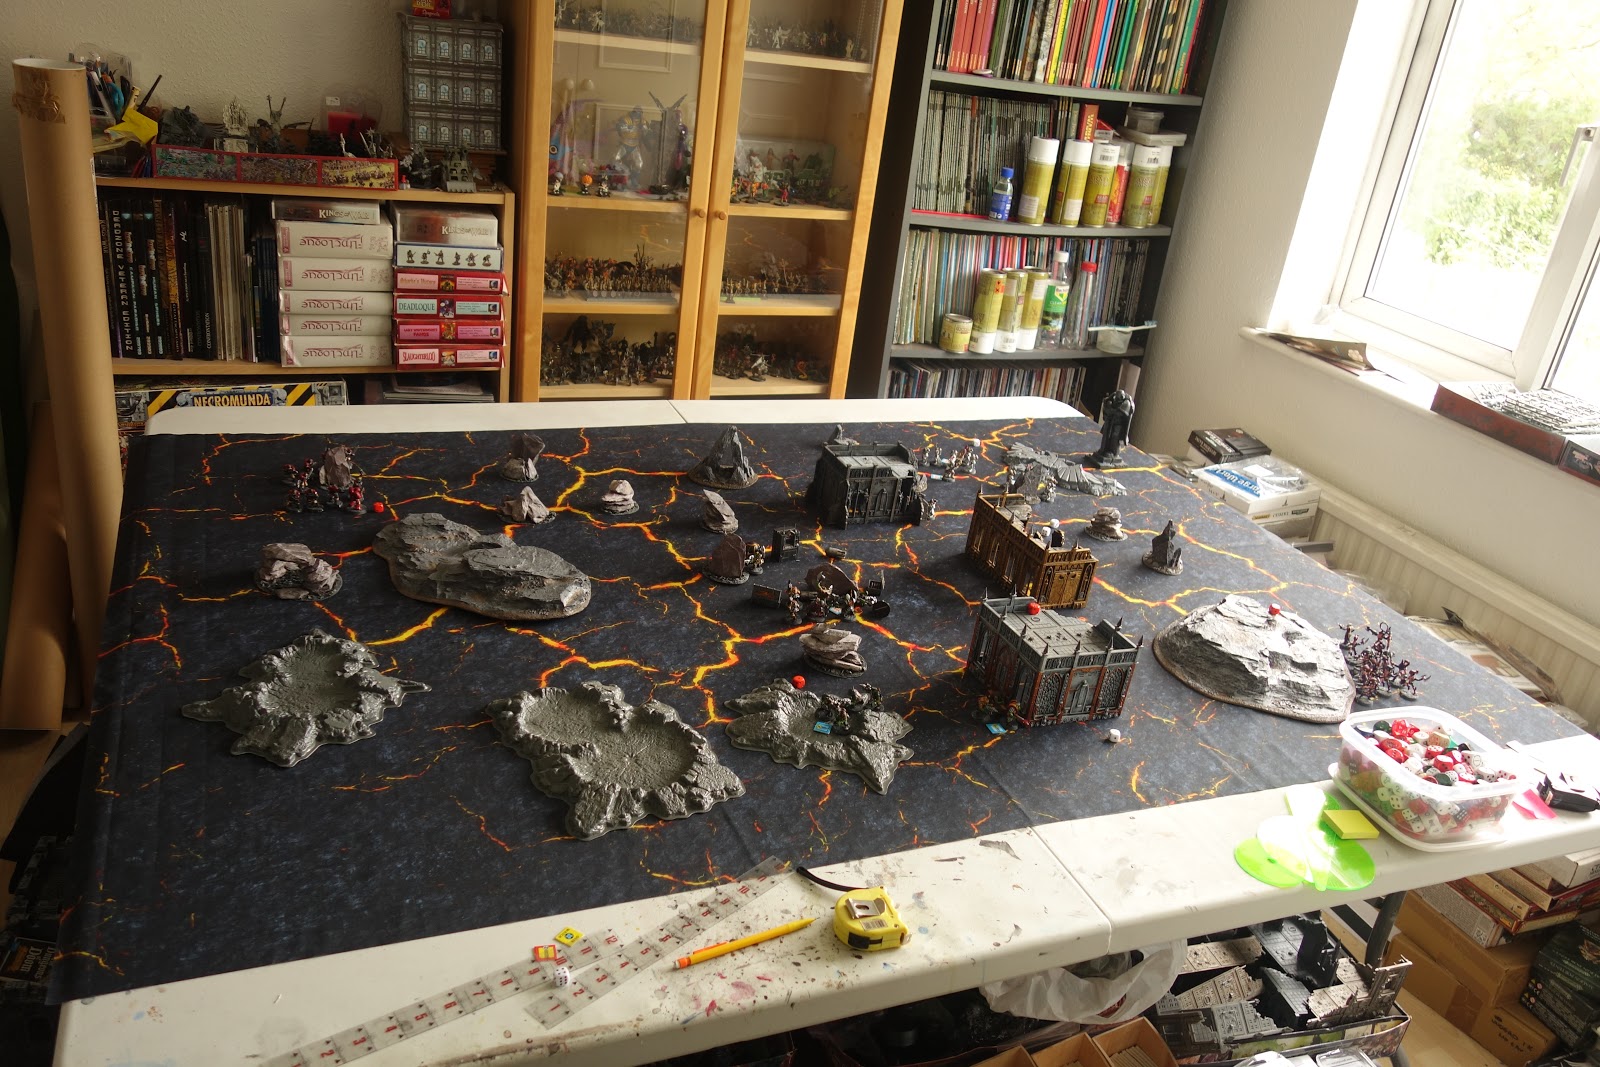
This is the table layout. After Five rounds of cityscapes I wanted things to try a different battlefield look. And, with six teams to keep track off, plus assorted special operatives, I didn't want too much crazy terrain and certainly not any high vantage points that would allow any team to dominate the game with long range shooting.

This was the final table layout.


The Orks choose a deployment zone on the centre of the near side. This left them vulnerable to attack on two fronts, but also gave them the most direct route to the archeotech. This was a calculated risk, but the hope was that they would be able to use their superior numbers to defend each flank. Unfortunately, their primary objective was the doomsday device, which was on the far row of archeotech.


The Sisters took the deployment zone on the far right side, hoping to use the extra mobility of their Seraphim to seize their primary objective, the data bank.

Deployment was complete and battle was joined. We'll see how it went it part two.

Saturday, 30 March 2019

Blood Angel Update

Having made a pretty decent start on my Death Guard, I thought it was a good time to go back to my Blood Angels, starting with a regular Marine Tactical Squad.

I'm in no way a competitive player, if I were my Blood Angels would probably be all Sanguinary Guard and Death Company with the compulsory troop choices made up of Scouts and, maybe, Intercessors. But I was never going to feel comfortable about that. I decided I wanted my army to have a theme and that it would represent the Fifth Company of the Blood Angels Chapter.

I chose the Fifth Company because they are a Battle Company, which means I can have a nice mix of different troop types and their company badge is a black blood drop, which looks cool. At full strength the Company would have Six Tactical Squads and Two each of Devastator and Assault Squads. But, thanks to losses sustained in the Tyrannic War, my Company has been augmented with Primaris Marines who are  still being integrated into the company structure - what this means is that I don't have to paint up all ten squads if I don't fancy it. Though I do have enough Tactical Marines for four.


My Tactical Marines are a mixed bag of models, some of whom I got when Warhammer 40,000 3rd edition was released. Some came from the 7th edition Kill Team box, which I planned to use as an excuse to get back into 40K, and then didn't. And some are Blood Angel Tactical Marines from the Starter Box, which I bought principally for the Baal Predator.

I have mixed and matched the different parts and models together so that no one squad looks too over done and I am quite happy with the result so far. I've got my technique for painting Blood Angels pretty well practised now. These were Painted in Mephiston red, with a wash of Carroburg crimson and edge highlights in Evil Sunz Red.The Black areas are Abaddon Black highlighted with Vallejo Black Grey and the bone and parchment areas use Privateer Press Menoth Base and Highlight with a Griffin Sepia Shade.


My next edition was something of an indulgence, but I couldn't resist a Furioso Dreadnought, who I have named Brother William for, reasons. I've been wanting a Dreadnought in this style since they first appeared, in metal, in 40K 2nd edition, but I only now got round to buying one.


I used the same basic techniques as the regular Marines, albeit with a lot more metal. I also added a fair bit more battle damage in the form of metal chips and scrapes around the edges and quite a few transfers, most noticeably on Brother William's right leg. The only thing I am less than happy with is the Wings, which look rather too white in the photos, but are actually Vallejo Silver Grey with Off White highlights.


One nice feature of the kit is the way the arms slide on and off fairly easily and stay in place with no glue, so I painted up both right arm variants, allowing Brother William to be kitted out with Two Furioso fists or one fist and a Frag Launcher as the mood takes me.


As has probably become apparent, what started as a Project based on the cheap Models that came with Warhammer 40,000 Conquest magazine has rapidly turned into an excuse to buy loads more models. This most notable in the squad below, fire Hellblasters with Assault Plasma Incinerators. In my defence, the Blood Angel specific box, which comes with a couple of upgrade sprues, is limited edition and rapidly vanishing off the shelves of discount hobby stores, so I snapped this one up while it was gettable. Also, the Hellblasters that come with Warhammer 40,000 Conquest only have regular Plasma Incinerators.


So far, I have only painted half the box, the other half have Heavy Plasma Incinerators. This was the first squad I undercoated with Mephiston Red spray, which sped things along a bit.


I'm not really a fan of either of the Primaris Captain models that have been released so far. The Gravis Captain looks chunky and awkward and the regular one too flat, as though he was cast in one piece. On the whole, I much prefer the Lieutenants, particularly the Chapter Specific ones. I picked this one up because I didn't like the idea of all my HQ units being specialists, I wanted at least one regular officer.


I pretty much stuck to my standard colour scheme, albeit with a gold shoulder logo and some electric blue lightning on the power sword. The Logo on his tabard is a transfer. And, as I write this I realise I forgot to add the Fifth Company Blood Drop to his right shoulder pad.


Finally, no Blood Angel Army would be complete without a Death Company Squad. I may not want the whole army made up of them, but I wanted at least one squad. These guys are actually pretty old models, dating back to third edition 40K, when I wanted to add some extras to the Marines I got in the starter box and the Blood Angel codex had just been released and seemed like more fun than conventional vanilla marines.


Although the bodies are pretty old, they do have at least a couple of more up to date weapons, most notably the Power Fist which my brother gave me, I think, from a Sanguinary Guard box he picked up cheap and cannibalised for parts.

I have actually had these picture ready for a couple of weeks now, but have been very slack about posting them. Since then I have completed a Chaplain and Rhino to accompany the Death Company. But with those completed, I am going back to the Death Guard for a bit. Pretty soon I should have what feels like enough painted models for a decent sized game.

Sunday, 17 February 2019

The Death Guard Return

So the Blood Angels are one half of Warhammer 40,000 Conquest, what about the other half?

When Games Workshop first released it's new Death Guard range I was in two minds. I had collected a Death Guard army before, back in Warhammer 40,000 4th edition (I used some of the models for my Shadow War Kill Team) and I have mixed new and old models in one army before, but I wasn't keen to do it again this time. One reason was that the old and new models are barely in the same scale. The new Death Guard have basically expanded to match the new Primaris marine and the old ones look pretty tiny next to them.


The other problem was the way I had painted the models. They were originally painted for a small campaign/tournament during a brief period in the early 2000s when I was a member of games club. I painted them very quickly using a method of dyrbrushing layers of grey over a brown undercoat. I was quite happy with the results, but there were two basic problems. Firstly, the results looked good from a distance, but look quite scrappy up close. The second was that I used yellow as a secondary colour, which has the odd effect of making the grey look purplish-blue, which was not at all the effect I was going for.

So I didn't want to add the new models to my old army, but I wasn't at all sure I wanted to start a brand new one. My little brother forced the issue a bit by buying me the Plague Brethren box for my birthday along with a box of the easy-to-build Plague Marines. But I set them to one side for a while, thinking I might use them as Plague Marines in another Chaos Marine army, possible Black Legion or Word Bearers.

But when Warhammer 40,000 Conquest came along and, particularly, when they sold off a Myphitic Blight Crawler for £7.99, I couldn't resist and took the plunge. When issue 12 of Conquest came with a Foul Blight Spawn I picked up two copies and used the first to test my new colour scheme.


I wanted to stick with my grey-drybrushed-over-brown because I thought it came out well, but I wanted a different contrasting colour and a way to neaten up the overall effect.

I gave the Blightspawn and undercoat of Army Painter Leather Brown and then drybrushed Vallejo Dark Grey and Neutral Grey over it. I then did a lot of edge highlighting in light grey which, I think, helps to pick out the detail. The armour edges were painted in Death Guard green, given a wash with Athonian Camoshade and a highlight of Deathguard Green mixed with Vallejo Olive Green. The metal areas were painted in Vallejo Natural Steel with a two heavy washes of GW Agrax Earthshade to give it a tarnished, rusted look. Some other areas were painted with Vallejo Bronze, given a wash or Seraphim Sepia and then a touch of Vallejo Verdigris Glaze (which I think I applied too heavily on the Blightspawn).

I had 9 Plague Marines by this point: The Plague Brethren and two sets of Easy to Build Plague Marines. I thought about converting one of the easy to build, so I could build a squad of 7 all of whom were unique, but then I realised the multi-part Plague Marine box came with close combat weapons and I couldn't resist grabbing a box. I then mixed and matched models to get two squads of unique individuals.


This first squad is for medium range fire support and includes two Blight Launcher Marines, Four Bolters (one with an Icon) and a Champion with a Plasma Gun and Powerfist. They were painted substantially in the same way as the Blight Spawn, though the fleshy areas were painted with Vallejo Rosie Flesh, washed with Reikland Flesh shade and highlighted with a mix of Rosie Flesh and Elf Flesh.

The picture below is a step by step of the Champion.


I found my drybrush, then edge highlight technique worked quite well on bone, which was handy as I always struggled to paint bone well. I used Privateer Press Menoth White Base and Menoth White Highlight, which I've had sitting around for years, along with a wash of Seraphim Sepia.


The Lord of Corruption came with Conquest Issue 19 and was my first official Character. I made the slime yellow on all my marines because I was already using green on the armour. I'm not sure if its snot or pus.


The Myphetic Blight Hauler uses the same techniques as the Marines, though the fleshy area at the back looks particularly bloated and gross in rosie flesh.

I painted my second squad of Plague Marines and my Biologus Putrifier at the same time. Using the same techniques as above though, by now, I think I was doing a better and more subtle job.


I'm particularly pleased with this squad. Five of them are from the multi-part Plague Marine box set, while the one with the Meltagun is one of the Plague Brethren and the one with the Bubotic Axe and Plague Knife is a conversion mixing parts from an easy to build marine with spare parts from the boxed set. This lot are a close combat squad, advancing as quickly as possible using assault weapons to provide support.


I badly wanted a Daemon Prince for my army. I had painted the official Nurgle Daemon Prince model for my old Death Guard army, but I wasn't keen to repaint him, include him in the new army in the old colour scheme or get a new version of the same model. Then I discovered that the Daemon Prince could be upgraded to have wings and hit on an idea.

I have seen a lot of Nurgle Daemon Princes that combine parts from a a Plague Drone with a Plastic Daemon Prince, but never one that went so far as to replace the legs to create a centauroid-fly hybrid. So I went on Ebay and got myself a drone. My original plan had been to get the Daemon Prince boxed set and use the upper body with just the bulbous lower torso and wings of the fly. But, having looked at the fly, I liked the idea of retaining its armoured carapace. So, I went back to Ebay and found someone selling the chest and arms of the Daemon Prince (along with some other random Daemon bits).


The finished Daemon Prince has the torso and arms of the Daemon Prince model attached to the front of the fly, which still has its wings. I also used one of the fly heads. The Cables come from a Defiler's Power Scourge. The organic chimney piece is part of a Tyranid bio-weapon while the trio of power coils are spare parts from old 40K buildings, while the large chimney on the back is actually from the very first plastic battlewagon model. I wanted the model to have a slightly steam punk feel, but the cables and other bits also help to fill the gaps. I have never been confident with green stuff.

The dead Space Marine is the spare easy-to-build Marine from Issue One of Warhammer 40,000 Conquest spliced with Zombie parts.

I stuck to the same colour scheme as the rest of the Marines, but left the unarmoured areas in Army Painter Leather Brown. I gave the whole thing a wash in Agrax Earthshade and then highlighted by mixing Vallejo Heavy Skintone with the Leather Brown.

That's it for now. I still have a fair bit more to paint, but I am taking a break to go back to my Blood Angels for the time being.

Thursday, 7 February 2019

Conquered

I really should have learned by now that there is absolutely no point in trying to plan my projects ahead of time. I've gotten pretty good at seeing projects through to completion, but when it comes time to choose a new project it's going to be whatever feels most exciting at the time, no matter what I may have thought before hand.

After I got finished with my English Civil War companies, my Shadow War campaign was still underway*, but keeping the kill-teams up to date really didn't take much time, so I was at a loose end. At about that time Warhammer 40,000 Conquest came out.

For anyone not paying attention, Warhammer 40,000 Conquest is a weekly part work magazine published by Hachette Publishing under licence from Games Workshop. Over the course of the magazines run, you can collect two armies for 40K, Plague Marines and Space Marines, plus scenery, paints and brushes. The collection leans heavily on Games Workshops "easy-to-build" range as well the contents of the Dark Imperium boxed set.

I snapped up the first issue, because it was priced at a ridiculous £1.99 as introductory offer and came with three Primaris Space Marines, three pots of paint and a starter brush. I snapped up two copies, but didn't have any plans to do anything with them.

Having decided I didn't want to subscribe, I grabbed issue 2, because it was £4.99, but then ignored things until issue 6 when the £7.99 magazine came with a Primaris Librarian, a model for which Games Workshop charge £22.50.

Blood Angel Scouts Shadow War Kill-Team

I had enjoyed painting my Shadow War Scouts as Blood Angels and that prompted me to pick up the Blood Angels Primaris upgrade sprue. Between the sprue and some chopping and repositioning I was able to put together a five man Blood Angel Primaris Squad, who I quickly set about painting.


I haven't had much success paitning Space Marines over the years, so I was pleased with how these came out. I kept things simple, giving them an all over base coat of Mephiston Red, followed by a Carroburg Crimson ink wash and then a lot of edge highlighting. After that I just picked out some details using Abaddon Black (which came with Conquest issue 1) and highlighting that with Vallejo Black Grey and painting the metal areas in Vallejo Natural Steel with a Nuln Ink wash.


I gave my Librarian a little more time and attention. He also gave me a good opportunity to use my Macragge Blue and Retributor Amour (Gold) which also came with Conquest Issue 1. That £3.98 has already gone a long way.


By the time I had my Librarian finished, Issue 11, with its easy-to-build Agressors was out. I already had the appropriate Blood Angel Agressor shoulder pads (though I had to cut away the easy to build ones to make them fit), so I could hardly resist.

Three units down, four if I use my Shadow War Kill-Team. Of course Space Marines are not the only army available through Warhammer 40,000 Conquest, but more about that another time.

* It still is underway, but I don't really have anything left to paint for it. I'm planning a big finale game, but it will take a fair bit of time and space so I'm holding out for when I have a long weekend or something.

Wednesday, 23 January 2019

The Great Rebellion

If you go back and read my blog posts from 2018, you'd be forgiven for thinking that I didn't do anything hobby related last year except play a few games of Shadow War. In fact, last year was pretty productive for me, I just got pretty bad at updating the blog. Rather than posting new pictures to the blog, I got into the habit of Tweeting things, which meant a few people saw them, but also that they disappeared pretty quickly into the ether.

So for no better reason than that I wanted a record, this is an update of one of my major projects of 2018, the two English Civil War companies I painted to use with the Pikeman's Lament rules, written by Daniel Mersey and Michael Leck and published by Osprey. This game is supposed to represent small actions with roughly 30 to 50 models aside.

I first posted about this project in March 2018. My plan was to paint up my two companies while continuing with my Shadow War campaign, occasionally breaking from ECW models to update my Kill Teams. In the end this is pretty much how it worked out and I managed to finish two complete companies of 24 points each, each made up of five units.


I started with my Royalist Company, who were based on the Marquis of Winchester's regiment Civil War re-enactors. The regiment they recreate were part of the garrison of Basing House, a now ruined Tudor Manor that's a short walk from Basingstoke and which I have visited a few times when the re-enactors have been in. They're supposed to be a well equipped company, hence the armoured Pikeman, but as they were mostly fighting a siege, they don't have any cavalry. My first unit was made up of Warlord Games metal armoured Pikeman, but with a plastic command group, including my company office in his nice green outfit. In game terms, I treat them as Veterans, which puts their point costs up to 6.


The Pikeman are supported by two units of shot, each worth 4 points each. I organised the plastic musketeers into one marching unit and one standing and firing. However, I didn't like the fact that the firing unit were all firing at once, so I added some metal reloading models. I have since discovered that at least some shot units did carry engage in mass volley fire, but I've painted them now, so tough.


This is a unit of Commanded Shot, skirmishers designed to hold up or disrupt the enemy advance. They are a mix of plastic and metal models I pinched from the Warlord Dragoon box. I also added the sniper with the long gun on the end. I was very keen to use him, because there is a long hunting musket on display at Basing House that may have been used in the siege. In rules terms I treat this unit as veterans, which means they don't suffer a -1 to hit if they skirmish (moving and shooting). This doesn't really represent a sniper very well, but there aren't really any rules in Pikeman's Lament that do, so it will have to do. Maybe, because he can shoot at a longer range, it gives him plenty of time to get up and move. The Veteran upgrade takes the unit to 4 points.


Finally I have included a heavy gun, worth 6 points, which has an engineer model added (he came in the same pack as the sniper). I like to imagine he is a foreign mercenary, hired for his expertise with gunpowder weaponry, hence his expensive yellow outfit and darker skin tone.

I have scattered a few black-British models in with the company. I don't know if this is historically accurate or how many black-British soldiers fought in the Civil War, but there were black-Britons as early as Tudor times, so I imagine the answer isn't "none." Also, every time a costume drama casts a black actor you get a few racists on Twitter or message boards complaining about "political correctness" which seems as good reason as any to include them.

The cannon is worth a mighty 6 points.

My second company are Parliamentarians, who represent men from Sir William Waller's regiment, who besieged Basing House in 1643. According to this website they wore yellow coats and carried a blue flag.


The infantry consists of one unit of Pike and one of Shot, though these are just standard units worth 4 points each.

I painted the models in both companies in much the same way. I gave them a spray undercoat of Army Painter Chaotic Red for the Royalists and Dessert Yellow for the Parliamentarians. I kept the detail simple, with one shade and one highlight with a second highlight for faces and skin, though I took a little more time over command groups. I gave most models matching coats, but tried to vary other colours because soldiers would have mostly worn their own clothes. I mostly kept to dull, earthy shades as tis was the era before chemical dyes.


I included a unit of Dragoons, mounted infantry that would move about on horseback and dismount to fight. Unlike many Pike and Shot rules, the Pikeman's Lament doesn't require you to include two sets of models, one on foot and one mounted. Instead it recommends a mix of mounted and unmounted models. Warlord's Dragoon box includes 12 mounted models and 12 on foot, which gave me plenty of spares. I plan to pain up some more to represent a Royalist Dragoon Unit at some point, but I still had a few left over to use for my Royalist Commanded Shot unit. I particularly like the model who's kneeling down to reload.

The Dragoons are a bit of a cheat. Apparently Waller's own regiment started out as infantry and were later mounted as Dragoons, so I have taken a bit of a liberty with history by including both in the same company.


My final infantry unit is a group of Forlorn Hope, which in Pikeman's Lament are small, elite units worth 6 points. These are represented by Warlord's plastic Firelock Musketmen, though I used a few spare hats from the infantry to give them some variety.


Finally, I have a unit of Parliamentary Cavalry, lead by the company Officer. Cavalry can be either Trotters, who advance slowly and fire pistols at medium range, or Gallopers who move at maximum speed and engage with swords and pistols at close range. I made this unit Trotters as that style is more associated with Parliament, though, in reality, I don't know how Waller's regiment would have fought. The Officer doesn't represent Waller himself, but one of his subordinates. The flag is based on the actual regimental flag, which I found online, scaled down and printed out.


Here are some pictures form a quick game I played to test out the rules. The Parliamentarians attempted to break the Siege by advancing through Marsh Land to attack a vulnerable spot in the Royalist defences.

The game was a lot of fun. The rules are very similar to Lion Rampant and Dragon Rampant and units have to pass tests in order to activate, with them being more likely to activate if they're ordered to do something they are comfortable with (it's easy to get musketeers to shot than charge, for example). Both sides suffered there fair share of failed orders, but in the end Parliament triumphed, though their office was killed by a lucky shot.

It's definitely a set of rules I would like to play again and there are plenty of different scenarios in the book to try out now that everything is painted.

I plan to be better at posting project updates this year, so, hopefully, the next post will not be such a massive info dump.